10.10.2011

Pumpkin Cupcakes

And now to continue the pumpkin goodness with pumpkin cupcakes. I found a recipe here for pumpkin cupcakes that come with a cream cheese frosting. Not only were they amazing, but they reminded me of these amazing pumpkin bars I used to get from a restaurant called The Brown Bag--the cakes were moist with a subtle spice, and the cream cheese frosting was sweet and cinnamon-y and delicious. I hope you give them a try!


  • You will need the following:

  • Cupcake ingredients:
  • 2 1/4 cups all-purpose flour
  • 2 teaspoons ground cinnamon
  • 1 teaspoon ground nutmeg
  • 1/2 teaspoon ground ginger
  • 1/2 teaspoon ground cloves
  • 1/2 teaspoon ground allspice
  • 1/2 teaspoon salt
  • 1 tablespoon baking powder
  • 1/2 teaspoon baking soda
  • 1/2 cup butter, softened
  • 1 cup white sugar
  • 1/3 cup brown sugar
  • 2 eggs, room temperature
  • 3/4 cup milk
  • 2 cups pumpkin puree
  •  
  • Cinnamon Cream Cheese Frosting Ingredients (for 12-15 cupcakes--see below):
  • 1 (8 ounce) package cream cheese, softened
  • 1/4 cup butter, softened
  • 3 cups confectioners' sugar
  • 1 teaspoon vanilla extract
  • 1 teaspoon ground cinnamon


First, sift the flour, salt, baking soda and powder, and spices together in a medium bowl. Be sure to use the spices listed--I know it sounds tempting to use pumpkin pie spice (which I did the first go around--it seemed logical, as the types of spices used are the same), but the ratio of the different spices will be off and you will lose some of the spice taste if you substitute. So try to use the ones listed if you can.

Next, you will combine the cupcakes' wet ingredients in a large bowl. Start with the butter and sugars. When well mixed, add the eggs one at a time until incorporated. Finally, add the milk and pumpkin. Add the mixture of dry ingredients a little bit at a time to the wet ingredients until fully incorporated.

Finally, preheat your oven to 350 degrees and grease two cupcake pans. Using a cookie scoop, pour the cupcake batter evenly into the pans (this recipe will make 24 total). Bake for 18-22 minutes or until golden (mine were done at 19 minutes).

While your cupcakes are baking, prepare your frosting. Using a hand-mixer, combine your package of cream cheese, butter, vanilla extract, and cinnamon. When well-combined, begin adding in your sugar in half cup increments. While the recipe suggests using 3 cups of confectioner's sugar, I would taste your frosting after two cups, then decide if you like your frosting a bit sweeter or a bit more savory. I liked mine sweet, so I used the full 3 cups, but you can definitely add less if you are content with the flavor.

Allow the cupcakes to cool completely before frosting (note: I only made enough frosting for 1/2 the cupcakes; since I was not going to eat 24 cupcakes in a few days--even I can't accomplish that--I chose to freeze the other 12 for a future week's dessert. Feel free to double the frosting recipe if you can use all 24 at once, though!).


All in all, these cupcakes turned out moist and yummy, and, with a mug of hot apple cider, they are the perfect way to end a fall day. Enjoy!

Pumpkin Bagels

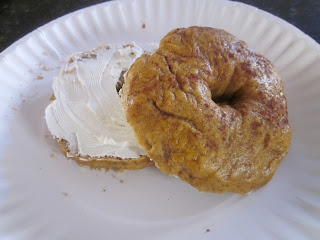
It's fall, and time for some recipes to match the season! Of course, that means I get to use one of my all-time favorite ingredients: pumpkin! I began to look into this particular recipe, the pumpkin bagel, because my husband could not find a pumpkin bagel at Dunkin Donuts. I had never made a bagel, and I tend to hesitate before attempting a yeast bread recipe (the doughnuts I made seemed to take forever), but it seemed like a perfect fall recipe and would make my husband happy, so I gave it a go with a recipe found here.

And you know what? It was delicious...and super easy!!! I hope you give these a try!


First, as stated on the website, you will need the following:

Dough:

  • 1/2 cup + 2 Tablespoons warm water (100-110 degrees)
  • 3 1/4 tsp instant yeast
  • 1/4 cup + 2 Tbs brown sugar
  • 1 tsp salt
  • 1/2 cup canned pumpkin
  • 1 1/2 tsp ground cinnamon
  • 1/4 tsp ground cloves
  • 1 1/2 tsp nutmeg
  • 3/4 tsp allspice
  • 3 cups bread flour
To cook:
  • 3 quarts water
  • 2 Tbs sugar
  • 1 tsp cinnamon (I used pumpkin pie spice)
  • 1 egg, for egg wash
First, combine all the dough ingredients in a large bowl, with the exception of the bread flour. You will want to use instant yeast if you can find it--I did not, and it took my dough a bit longer to rise. When these ingredients are well integrated, add the bread flour a little at a time, mixing until it is just incorporated (you never want to over-mix a dough). I did this by hand, but you could also use a stand mixer if you have one--just use the dough hook attachment.

Turn the dough out onto a floured surface and knead for 10-12 minutes. The dough will start out a bit dry, but will come together by the end of the kneading process. Place kneaded dough in a greased bowl, turning once to make sure all sides of the dough are greased, and let sit for an hour.

Once the dough has sat for an hour, punch it down in the bowl and then divide it into 8 equal pieces. Use your hands to shape each piece into a bagel shape (roll it into a ball, create a hole in the middle with your fingers, then flatten the dough). Place bagels on a greased baking sheet for another 45 minutes to an hour to allow them to expand in size.

Finally, it is time to cook the bagels! First, preheat your oven to 400 degrees and bring a large saucepan full of water and 1 tablespoon of sugar to a boil. Drop in two to three bagels at a time and boil the bagels on each side for 1-2 minutes. Remove from water and set on a greased cookie sheet. Once they have all been boiled, brush the tops of each bagel with egg wash and sprinkle sugar and either cinnamon or pumpkin pie spice over the top. Bake in the oven for 15 minutes or until golden brown.

And voila! You have homemade pumpkin bagels--add a little cream cheese mixed with cinnamon, and you have a delicious breakfast that practically screams fall. Enjoy!


9.14.2011

Bacon Turkey Bravo with Broccoli Cheddar Soup

And now, for another of our fast food family favorites (yay alliteration!): my attempt to replicate the deliciousness of Panera bread. The Bacon Turkey Bravo sandwich, in particular, has always held  a special place in my heart. Not only is it beyond yummy and adored by my sister and cousin, but my husband and I both ordered it on our second date--one of the first signs that we were meant to be!

For the record, the internet is an amazing resource when it comes to locating anything that has ever been made at any time any where, so if you have a favorite restaurant food you'd like to attempt, google it to find a copycat recipe. It'll be extremely close to the original, make more food, and be cheaper overall for the amount of food it produces. First, I found copycats for the sandwich and the broccoli soup. However, the sandwich recipe did not include Panera's tomato basil bread, so I found a different recipe for the bread itself here. Allow me to briefly tempt you with the final result:


And since now you are hungry and want homemade Panera, let's start with the bread. You will need:


1 (1/4 ounce) package active dry yeast
3/4 cup warm water (110 to 115 degrees)
1/4 cup fresh basil, minced (I substituted 2 tablespoons dried)
1/4 cup parmesan cheese, grated
3 tablespoons tomato paste
1 tablespoon sugar
1 tablespoon olive oil
1 teaspoon salt
1/8-1/4 teaspoon crushed red pepper flakes
2 1/2-2 3/4 cups bread flour


This came out with a very strong tomato/basil flavor (I know, that seems to be a "duh" statement, given what it is, but it was a bit strong compared with the Panera version). If I were to do this recipe over again, I would omit 1-2 tablespoons of the tomato paste and 1 tablespoon of dried basil. I would also add an extra  tablespoon or two of sugar to sweeten it a bit. This version, however, would taste AMAZING as part of a grilled cheese.

To make, first pour the yeast packet into a large mixing bowl. Add water and dissolve the yeast. Next, add the basil, tomato paste, parmesan cheese, sugar, oil, salt, pepper flakes and mix. After, add flour a little at a time, using a kitchen spatula to incorporate the flour into the wet ingredients. I didn't need more than 2.5 cups.

Flour a non-porous surface and place the dough mixture on top. Don't be worried if the dough looks somewhat dry at first--kneading will take care of it! Simply knead the dough for 3-5 minutes, then place in a greased bowl (turn once to coat the top of the dough to prevent sticking upon removal). Cover and let the dough rise until it doubles in size, about an hour.

When the dough has doubled, remove from the bowl and knead again for another minute. Shape into a round loaf and place on a greased baking sheet. (Note: I may try to make my bread into a rectangular loaf shape in the future for a more uniform shape). Allow dough to double again (another hour or so).

Finally, cut a cross shape into the top of the bread loaf. Bake at 375 degrees for 30 to 40 minutes. Bread will be golden and crusty on the outside, but soft and yummy on the inside!


And a close-up to give you an idea of the color of this bread. I love how you can see the little specks of basil:


Set the bread aside and move on to your soup. You will need:

1/2 medium onion, chopped
1/4 cup melted butter
1/4 cup flour
2 cups half-and-half
2 cups chicken stock or bouillon
1/2 pound fresh broccoli
1 cup carrots, julienned
salt and pepper, to taste
1/4 teaspoon nutmeg
8 ounces grated sharp cheddar cheese

Saute onion in the butter until translucent. Add flour and whisk together for 3-5 minutes, until thick and non-lumpy (it is ok to leave the onions in the pan while you do this). Slowly add in the half and half until well-mixed and no lumps appear, then bring to a boil to thicken. Finally, add the chicken stock and simmer for 20 minutes.

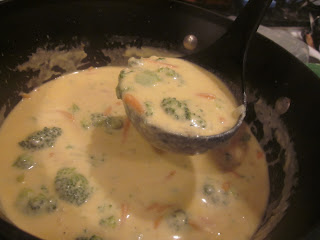
Add the veggies (broccoli and carrots) and cook until tender (another 15-20 minutes). If you want an even thicker soup, you can puree the soup in batches in a blender. I thought the soup was already fairly thick, and I enjoy having the full pieces of broccoli in my soup, so I did not blend mine. Instead, I added the cheese, mixed until it was melted, and served the warm, cheesy soup!


Mmmm....look at that broccoli--my favorite vegetable!


And finally, put it all together! Cook up some slices of bacon, slice some fresh Gouda cheese, and wash some leaves of lettuce. Pile high with some thick-cut turkey on slices of your freshly-baked bread. Top it all off with the special Bacon Turkey Bravo sauce, a mix of:

1 cup mayonnaise
1/2 cup ketchup
2 tablespoons lemon juice
1/2 teaspoon dried mustard
1 teaspoon Worcestershire sauce
1 dash of tabasco or other hot sauce


And voila! A homemade Bacon Turkey Bravo sandwich to accompany your homemade Panera Broccoli Cheddar soup. Enjoy!


9.07.2011

Healthy Blobs

I know, I know--the title sounds less than appealing. But, that was what Melanie called them on dietriffic, so I am going to use her title. Don't let the strange name send you running, however; I know that I was skeptical of these at first too, but I really needed a new breakfast idea that I could quickly grab in the morning, and these ended up being tasty and filling! (It also helps to use up any remaining cornflakes you have from your cornflake chicken recipe)

You will need:
-1/2 cup peanut butter
-1/4 cup dried milk (I omitted this--I cheaped out on the extra $7)
-2 tablespoons honey
-3 cups of corn flakes 

To make, simply mix all of the above ingredients together by hand carefully, then separate the cornflake mixture into ten little cornflake blobs. I packaged mine individually in saran wrap for ease of transport and minimal mess and placed them in the freezer to help them hold together better. 

Now I will say that, if my blobs were out of the freezer for too long, they would sort of fall apart into little peanut-buttery corn flake baby blobs--still incredibly tasty, but not exactly a one-handed snack--so they might have held together better had I used the dried milk or crushed the cornflakes first. Since I have a psychological block on paying an extra $7 for dried milk when I already have the liquid variety for half that, I will probably continue to make mine the same way--but if you try a variation, please let me know how they work out for you!

Either way, paired with a glass of milk, they kept me full until lunch and were a sweet way to begin my day. So, give healthy blobs a shot at breakfast, and enjoy!

9.05.2011

Turkey Sliders with Sweet Potato Fries

Growing up, my family was very "meat and potatoes" oriented. Maybe that's part of the reason that I love potatoes in a way that borders on obsession...

That said, unless we were eating chicken, red meat was usually the meat of choice at home. Tacos, meatloaves, and of course, burgers were all made using ground beef. I'm sure I must have heard of the concept of ground turkey at some point, but turkey as anything other than what you ate on Thanksgiving Day seemed like something that would only interest health nuts.  Then one day, my friend Gina made me a turkey burger--and it was so delicious, I have not made a burger with ground beef since.

This particular recipe is for turkey sliders, but the ingredients would be identical if you chose to make larger burger patties. And while I will get to the sweet potato fries later on in the post, these sliders are really the heart of this meal. Great as an appetizer or a meal that appeals to kids, I guarantee that you will want to make these again and again--and you will NOT miss the ground beef!


You will need the following for the turkey sliders:

-1 pound of ground turkey
-1 whole egg
-1-2 tablespoons of Worcestershire sauce
-1 tablespoon crushed red pepper flakes
-1 teaspoon onion powder
-1 teaspoon dried parsley flakes
-Salt and pepper to taste
-3 slices of cheddar cheese, each cut into four squares
-12 Hawaiian rolls, sliced
-Suggested toppings: lettuce, tomato, onion
-Suggested condiments: mayo or ranch dressing mixed with hot sauce or ketchup/mustard

First, cut your cheese squares into quarters and slice your Hawaiian rolls (if you prefer slider buns, those work too--I just love the sweetness of the Hawaiian rolls). Set aside, and preheat your griddle to 350 degrees (or prepare your grill/pan--whatever you are using to cook them!) and spray with cooking spray to prevent sticking.

Next, crack the egg into a large bowl and beat lightly. Add in the ground turkey, spices, salt and pepper, and Worcestershire sauce. Mix well by hand. Note that you do NOT need to add in bread crumbs; the mixture will stick together well enough without them, so why add the extra calories?

When the griddle is ready, make 12 small patties out of the turkey mixture and place on the griddle. Leave them be for about 4 minutes, or until the bottom halves of the turkey patties begin to turn white (and brown on the bottom). Flip the burgers and cook for another two minutes. Place cheese slices on the patties and cook for an additional two minutes. The cheese should be melted.

Place your turkey burger patties onto the Hawaiian rolls, cover with veggies and condiments of your choosing, and they are ready to eat! Healthy turkey sliders--prepped and ready to eat in under 20 minutes!


Of course, you can't eat a burger without fries. And, since you're already doing so well on the health front, it would probably be best to pair your turkey burgers with a healthy side. Luckily, sweet potato fries are a healthy AND tasty option. I found a great set of instructions on this site, because my previous attempts at sweet potato fries came out too soggy. You will need the following:

-2 large sweet potatoes
-1/4 cup of olive oil
-1 teaspoon paprika
-salt to taste

Preheat your oven to 450 degrees. Peel your sweet potatoes and cut off the tips to prevent burning them. Cut your peeled sweet potatoes into 1/2" to 3/4" wedges and place in a large bowl. Next, drizzle olive oil and sprinkle salt and paprika over the top of the wedges. Toss to coat evenly.

Spread the seasoned potato wedges onto a cooking sheet that has been sprayed with cooking spray to prevent sticking. Be sure that none of the potato wedges are touching each other, because this can lead to a soggier texture when they are finished. Bake for 15 minutes, turn the fries, then return to the oven for another 8-10 minutes. That's it! The paprika from the fries will compliment the kick from the crushed red pepper flakes in the turkey burgers, making them an ideal combination. Enjoy!

9.04.2011

Blondies

So, we finally ran out of cake balls and needed a new dessert. My husband said he would be happy with cookies, and since I know he also loves brownies, I decided to try to make blondies (or blonde brownies--sort of a cross between a brownie and a cookie). See below:


I found a recipe here. I took the recommendation of some of the posters on this recipe and doubled the recipe, so if you want a 9x9 sized pan worth of blondies, use the ingredient amounts below. If you'd prefer a 9x13 sized pan, double the ingredient amounts below:


  • 1 cup all-purpose flour
  • 1/2 teaspoon baking powder
  • 1/8 teaspoon baking soda
  • 1/2 teaspoon salt
  • 1/3 cup butter
  • 1 cup packed brown sugar
  • 1 egg
  • 1 tablespoon vanilla extract
  • 2/3 cup semisweet chocolate chips


The procedure for making this recipe is, not surprisingly, very similar to making chocolate chip cookies. So, first, preheat your oven to 350 degrees and sift your dry ingredients (minus the brown sugar) together into a medium bowl.

Next, melt your butter and pour into a large bowl. Add brown sugar to this bowl and mix well to combine with the butter. Make sure to get all the brown sugar lumps well integrated. Add the egg and vanilla to the brown sugar mixture.

Add the flour mixture a little at a time to the brown sugar mixture, mixing well to prevent the formation of lumps. Finally, mix in the chocolate chips.

Grease a baking dish or spray with cooking spray to prevent sticking (9x9 for the recipe as listed; 9x13 for a double batch). Pour blondie batter into the baking dish, and bake for 20 to 25 minutes. When the blondies begin to set and turn a golden color, they are done! Cut into 24 slices, and enjoy the flaky, buttery blondies!


Cornflake-Crusted Chicken Tenders

Chicken has always been a staple in my family--to the point where, growing up, my relatives would joke that I was adopted because I wasn't as fond of it as I am now (all in good fun--no worries!). Since then, most of my recipes have involved chicken--mostly in casseroles or baked with some sort of accompanying sauce--because it is healthy and tasty.

But, my friend Sarah has been posting this recipe in various forms on Facebook (chicken, chicken parmesan) and explaining how popular it is in her house--and admittedly, you miss a good crispy, fried chicken amid all the healthy chicken recipes--so I finally gave it a try yesterday. And it was every bit as tasty as she promised (and considerably healthier than actual fried chicken)! 

Here are the ingredients as listed by the recipe (I only used about 1/6th of this for my husband and me):

  • 7 cups Kellogg's Corn Flakes® cereal (crushed to 1 3/4 cups)
  • 1 egg
  • 1 cup fat-free milk
  • 1 cup all-purpose flour
  • 1/2 teaspoon salt
  • 1/4 teaspoon pepper
  • 3 pounds chicken pieces, (without or with skin) rinsed and dried (I used boneless, skinless chicken breasts)
  • 3 tablespoons margarine or butter, melted
First, crush the corn flakes. I placed mine in a large ziplock bag, removed the air and sealed the bag, and then used a rolling pin to crush the flakes in the bag. Place crushed corn flakes in a shallow dish.

Next, prepare your batter: beat egg and milk together in a medium-sized bowl. Add flour, salt, and pepper and whisk together until smooth. Meanwhile, melt the butter in a microwave, and get out your chicken. I chose to make chicken tenders, so I cut my chicken breasts into 3 pieces each, but a whole chicken breast works just as well.


Spray a baking dish with cooking spray and preheat your oven to 350 degrees. To prepare your chicken, first dip the chicken pieces into the batter, then roll in the crushed cornflakes. Make sure that the chicken is evenly-covered, then place in the baking dish. Drizzle the melted butter over the top of the breaded chicken pieces.

If you are following the recipe, bake uncovered for approximately one hour; if you are making 6 chicken tenders (like I did for my husband and me), 35 minutes will do the trick! Just be sure the internal temperature of the chicken reaches 165 degrees before eating. Enjoy!