12.22.2011

Holiday Desserts

With Christmas Eve just two days away, I thought I would take a moment to group together some of my favorite holiday dessert recipes, both ones I have tried on the blog, ones others have made for me, and ones I am hoping to try (if my husband is willing to humor me messing up the kitchen all over again--I love you, honey!!). I will include links to each recipe and hope you will forgive the lack of step-by-step directions. Recipes I have yet to try will probably have their own blog entries at a later date.

First, holiday cookies:
Gingerbread men: not going to lie--I go Betty Crocker mix on this one, because let's be honest--the fun is really in the decorating anyway. You still have to make the icing though, so I simply mixed powdered sugar with tablespoons of milk. It comes out just like royal icing, but without the egg that can be dangerous for pregnant guests. I mainly decorated the edges and faces of the gingerbread men and women with icing and Christmas colored M&Ms.


However, I also found a mini-gingerbread man cookie cutter and not only made some bite-sized cookies for my party, but also some cute gingerbread mom cookies for my new and expecting mom friends!


Mint chocolate chip cookies (I've also seen these called Grinch cookies) found here. These are best served warm--when the chocolate and mints are still gooey and delicious. These were a hit at a cookie swap I went to last year and are SO simple to make!


Chocolate crinkles recipe found here. These are my husband's favorite cookie, and they are amazing--their texture and taste is rich and moist, almost like eating a brownie. Added bonus? My husband made them himself this year to help me get all the food ready for our Christmas party. Love that guy.


Miscellaneous dessert recipes from blog:

Peppermint bark


Christmas tree cupcakes


Red wine chocolate cake


Finally, the recipes I have left to attempt are:
Nutella Chocolate Fudge with Dark Chocolate Sea Salt Ganache
Red Velvet Cake Roll
Button Sugar Cookies (not so much a Christmas dessert as a gift for my mom)

Feel free to share any holiday dessert recipes you have tried and loved, and stay tuned for post-Christmas blog updates! Happy holidays and enjoy!

12.20.2011

Red Wine Chocolate Cake

What better way to celebrate May the Fork Be With You's 50th blog post than with cake, chocolate, and wine? Better yet, what if there was a recipe that combined all three of those yummy items with a honey mascarpone frosting? Oh yeah. This exists. And it. is. delicious. Recipe found here.


You will need:
For the cake:
1/2 cup (1 stick) butter, softened
3/4 cup light brown sugar
1/3 cup granulated sugar
1 large egg
3/4 cup red wine
1/4 cup plain yogurt
1 teaspoon vanilla extract
1 1/4 cups all-purpose flour
3 tablespoons cornstarch
3/4 cup cocoa powder
1/4 teaspoon baking soda
1/2 teaspoon baking powder
1/4 teaspoon salt

For the frosting:
1/2 cup (4 ounces) mascarpone cheese
1/2 cup heavy whipping cream
2 tablespoons honey

First, preheat oven to 325 degrees. In a large bowl, cream together the butter and sugars. Add egg and vanilla extract. Finally, add yogurt and red wine.

Next, in a medium bowl, combine flour, cornstarch, cocoa powder, baking soda and powder, and salt. Fold mixture into the red wine mixture, blending well but taking care not to overmix. Pour into greased 5x9 loaf pan and bake for 50-60 minutes. When finished baking, allow to cool completely before frosting.


To make the frosting, combine mascarpone cheese, whipping cream, and honey in a medium bowl and whip using a hand mixer until soft peaks form. Serve on top of cake, and enjoy a slice with a glass of red wine (and an evening reading May the Fork Be With You)!


12.16.2011

Turkey Wontons

After Thanksgiving, my mom and sister were kind enough to send my husband and I home with some delicious leftover turkey. It would have been wonderful as is, but I wanted to see what other recipes I could find to use the turkey more creatively. I found: turkey wontons. Now, finding the wonton wrappers to make this dish happen proved to be something of a challenge. It took trips to four different grocery stores, but I finally located some near the soy products at Whole Foods (along with gelato-filled cupcakes!! Seriously, I could just move into that store *dreamy sigh*). Any way! If you have some leftover turkey this holiday season and are in the mood for some Chinese food, give these a try.


You will need the following:
Wonton wrappers
Soy sauce for sealing wonton wrappers
Vegetable oil for frying

For filling:
1 lb. ground turkey (I used shredded turkey leftovers)
1-2 Tablespoons of minced ginger root
5 scallions, white and light green part thinly sliced
1 Tablespoon minced garlic
About 1-1/2 cups cooked chopped greens, squeezed dry, such as spinach, chard, kale, or mustard greens
1 Tablespoon soy sauce
1-2 Tablespoons hoisin sauce
1 egg

I made my wontons more crab-rangoon style (not sure if this negates their wonton-ness or not, so feel free to check out the website's cooking method too and decide which your family would prefer).

First, combine all the ingredients for the filling in a large bowl, taking extra care to shred the turkey leftovers to help them stick to the remaining ingredients better.

Next, lay out your wonton wrappers. Using a small brush, paint the edges with soy sauce to help the edges stick together. 

Place a tablespoon of filling in the center of each wonton wrapper, then fold the wonton in half, forming a triangle. Use a fork to fully seal the edges.

Once all the wontons are made, heat oil in a large skillet. Carefully place 3-4 wontons in the skillet at a time, cooking 1-2 minutes per side until golden brown. Remove from skillet and place on a plate with paper towels to absorb excess oil.

Serve with extra soy sauce for dipping or, if desired, veggie fried rice or noodles. Enjoy!


12.15.2011

Bleu Cheese Steak with Croutons

While watching Food Network at the gym one day (and yes, I am fully aware of the irony behind that statement), I watched Bobby Flay grill a steak with bleu cheese on top. Bleu cheese is not my favorite of the cheeses (no one can replace you in my heart, goat cheese!), but my husband really enjoys it. So, I decided to give the idea a go. I actually used a recipe from allrecipes.com, since it received higher ratings: topped with bleu cheese and homemade croutons, this recipe is a perfect meal for date night--or a weekday dinner that will take your steak to a whole new level!


You will need:
2 (6 ounce) beef tenderloin filets, 1 1/2 inches thick
2 ounces blue cheese, crumbled
2 tablespoons butter, softened
2 slices white bread, crusts removed and cubed
1 tablespoon olive oil
2 tablespoons grated Parmesan cheese

First, set your steaks on your broiler pan and turn on your broiler. Broil about 6 inches from the broiler for 5-8 minutes per side, or until desired level of doneness is achieved.

Meanwhile, in a bowl, combine butter and bleu cheese. Set aside.

Saute bread cubes in olive oil until lightly browned. Set aside.

Finally, when steaks are cooked, remove from the oven. Top them with the bleu cheese butter and place back under the broiler for a minute or two, until the cheese melts. Before serving, top with croutons and sprinkle parmesan cheese over the top. The steak will be incredibly moist and flavorful!

Serve with mashed potatoes (or, since the cheese makes this a slightly heavier main course, a salad). Enjoy!


12.10.2011

Candy Cane Martinis

Let me preface this by saying that you really should not make this into a martini. We found this listed as a martini, and it tastes delicious...almost like a drinkable, girl scout thin mint cookie. However, it is also nothing but alcohol, and does not lend itself to longevity in drinking (some of our Christmas party guests discovered this the hard way). It would make for a perfect shot, however!


You will need:
1/2 oz Peppermint Schnapps
1/2 oz Creme de CaCao
1/2 oz vodka
Ice
Optional garnishes: crushed peppermints or mini candy canes for glass rim)

If making these into martinis, first prepare your glasses by dipping the rims of the glasses into water and then crushed peppermint dust. Pour all other ingredients except for garnishes into martini shaker.  Shake and pour into desired glass (really--shot glasses here, people!). Garnish with mini candy canes if desired and serve.

Enjoy responsibly, and happy holidays!

12.09.2011

Red Velvet Mini-Cupcakes with Cream Cheese Frosting

I was never terribly familiar with red velvet cake. I've always been a straight-up chocolate cake girl, and my family never really made it for me to compare the two. But we were hosting a Christmas party, and what better combination of colors for Christmas than a red base--and green Christmas tree-looking frosting??? (Idea for Christmas tree frosting from Pinterest; recipe for cupcakes from allrecipes). The result was amazing--this was easily the best frosting recipe I have ever tasted, and the cupcakes themselves were so flavorful and chocolate-y that I am looking for additional ways to make red velvet cake in the future. Do yourself (though maybe not your waistline) a favor, and give these a try!


You will need (for 30 cupcakes or 60 mini cupcakes):
For cupcakes:
2 1/4 to 2 1/2 cups flour (the latter amount will make a denser cake)
1/2 cup unsweetened cocoa powder
1 teaspoon baking soda
1/2 teaspoon salt
1 cup butter, softened
2 cups sugar
4 eggs
1 cup sour cream
1/2 cup milk
1 (1 ounce) bottle McCormick® Red Food Color
2 teaspoons McCormick® Pure Vanilla Extract

For vanilla cream cheese frosting:
1 (8 ounce) package cream cheese, softened
1/4 cup butter, softened
2 tablespoons sour cream
2 teaspoons McCormick® Pure Vanilla Extract
1 (16 ounce) box confectioners' sugar
*If desired: green food coloring and sprinkles

First, preheat your oven to 350 degrees. In a medium bowl, combine flour, cocoa powder, salt, and baking soda. Set aside.

In a large bowl, use a hand mixer to cream the butter and sugar together. Add in your eggs one at a time. Next, mix in sour cream, milk, food coloring, and vanilla. Finally, fold in flour mixture, making sure that batter is well-combined, but not over-mixed. Spoon into greased or lined cupcake pans so that each cup is 2/3 full.

For cupcakes, bake 20-25 minutes. For mini-cupcakes, bake 12-15 minutes. They are done when a toothpick inserted in the center comes out clean or when the cakes spring back when touched.

Allow cupcakes to cool and make your frosting. First, cream together butter and cream cheese with a hand mixer. Add sour cream and vanilla. Finally, add the confectioners' sugar in batches (this will keep you from spraying sugar all over your kitchen!). If you want to make Christmas tree frosting, add about a 1/2 oz of green food coloring to the frosting and finish mixing.

To decorate, use a piping bag or ziploc bag with the tip cut off to create a tree-shaped mound of frosting on top of each cupcake. Top with round sprinkles and a star-sprinkle on top for a delicious Christmas dessert!


As you can see, these mini cupcakes make a great addition to any holiday spread--I know I had more than a couple at our party. So give them a try, and I hope that you and your guests enjoy them. Happy holidays!


12.02.2011

Peppermint Bark

One of the first things I watch for around the holidays is Ghiradelli's peppermint bark squares. Maybe it's because they are seasonal and limited, a la McRib, or maybe it's because they are minty chocolate goodness; either way, my younger sister and I usually have some on hand during our Black Friday outings. So this year, I decided to see if I could make my own. Turns out, it's not that hard--and it's far cheaper and chocolate-ier than Ghiradelli.


You will need:
12 oz. dark chocolate (I used Dove--it's the only dark chocolate I really love)
12 oz. white chocolate (I used Baker's--it melts easiest)
24 hard peppermint candies

Line a jelly roll pan with parchment paper. In a glass bowl, microwave your dark chocolate in 15-30 second intervals, stirring in between each microwaving to prevent burning. When completely melted, pour onto parchment paper. Using a spatula, make sure that the melted chocolate covers the entire bottom of the pan evenly. Place in the refrigerator to harden for 10-20 minutes.

In the mean time, unwrap your peppermint candies and place in a ziploc bag. Use a rolling pin to break the candies, hitting and rolling until you have mostly peppermint dust and a sprinkling of larger peppermint pieces in the bag. Alternately, you could place the candies in a food processor. I just hate the dishes and like the arm workout of the rolling pin.

Microwave your white chocolate in the same way that you microwaved the dark, then fold in the peppermint dust and pieces until well-mixed (note: you can also strain out the large pieces and sprinkle those on top at the end if you would like the peppermint bark to look even prettier; the inside of my stomach, however, is not as discriminating). 

Finally, pour the peppermint-y white chocolate over the top of the refrigerated dark chocolate layer. Be sure to work quickly and carefully to spread the white chocolate layer over the dark chocolate layer, as the heat of the melted white chocolate will start to melt the refrigerated dark chocolate layer below. 

Place back in the refrigerator to harden for another 30-60 minutes and remove from parchment paper. (Note: you probably shouldn't eat the giant piece of peppermint bark--but I liked knowing that I could).


Break into pieces and enjoy!


11.30.2011

Deep Dish Pizza

Having grown up in the Chicago burbs, there is nothing better than a deep dish pizza. My husband and I are partial to Giordano's and my sister-in-law loves Lou Malnati's. Whatever your preference, there's no beating that first bite into cheesy, saucy, doughy goodness. I made my own version, using my pizza dough recipe from my Pizza Margharita recipe and an awesome sauce recipe. It wasn't as good as Giordano's (not sure any pizza really could be), but it was still extremely tasty, so try this recipe and get a taste of Chicago today!


You will need:
For the dough:
2 1/2 cups all-purpose flour
1 (1/4 ounce) package active dry yeast
1 tablespoon sugar
1/4 teaspoon salt
1 cup warm water
1/2-1 tablespoon olive oil
1-2 teaspoons of oregano
cornmeal, for sprinkling

For the sauce:
1 (6 ounce) can tomato paste
6 fluid ounces warm water (110 degrees F/45 degrees C)
3 tablespoons grated Parmesan cheese
1 teaspoon minced garlic
2 tablespoons honey
3/4 teaspoon onion powder
1/4 teaspoon dried oregano
1/4 teaspoon dried marjoram
1/4 teaspoon dried basil
1/4 teaspoon ground black pepper
1/8 teaspoon cayenne pepper
1/8 teaspoon dried red pepper flakes
salt to taste

Toppings:
8 oz. mozzarella cheese
4 oz. parmesan cheese
Pepperoni, sausage, or veggies of your choosing

First, make dough according to Pizza Margharita pizza recipe (see here).

Make your sauce by combining and simmering all ingredients in a small sauce pan for 20-30 minutes to give the flavors a chance to meld.

Finally, sprinkle cornmeal into a deep dish pizza pan (I used a spring form cheesecake dish) and roll out your pizza dough into the pan, pressing the dough an inch and a half up the sides of the dish and pressing firmly into the bottom. Prick the dough with a fork to prevent dough from bubbling.

Layer the following on top of the dough:
-Mozzarella cheese and 3 oz. of the parmesan cheese
-Meat/veggie toppings
-Sauce
-Sprinkle last oz. of parmesan cheese on top

Bake at 425 degrees for 20 to 30 minutes. Allow to cool for 5-10 minutes, then cut and enjoy!


11.28.2011

Butternut Squash Soup

This is a bit late for the season, but this butternut squash soup recipe would be a perfect beginning to a Thanksgiving Day meal. It tastes like warm pumpkin pie in soup form--and having never had squash before, I was definitely pleased! Recipe found here.


You will need:
1 butternut squash, peeled, seeded and cut into 1 inch cubes
1 yellow onion, diced
4 cloves garlic
3-4 sprigs of fresh thyme (pull leaves off twiggy part)
4 cups vegetable stock
1 Tbsp extra virgin olive oil
1/2 tsp cumin
1/4 tsp nutmeg
1/4 tsp cinnamon
1/4 tsp black pepper
salt & pepper to taste

First, peel, de-seed, and chop your squash. This was probably the most challenging step of the process--those things are hard to chop! Totally worth it, however. Set squash aside.

Next, chop your onion and garlic. Heat oil in a large skillet and saute the onion, garlic, and thyme until soft and fragrant (5 minutes or so). Add in the squash and continue to saute for another minute. Transfer skillet contents to a large sauce or stock pan.

In sauce pan, add the vegetable stock to the onion/garlic/thyme/squash. Bring to a simmer and cook for 30-40 minutes, or until squash is soft. Add in remaining spices and simmer for a few minutes more.

Remove from heat and use an immersion blender (or carefully transfer to a regular blender) and blend until smooth. Serve warm.

Now, the picture shows a sprinkling of parmesan cheese, as the original recipe called for. I found the parmesan cheese to be too overpowering for the sweetness of the soup, however. A sprinkling of a milder cheese, some croutons, or a dusting of paprika would have been yummy, however! Enjoy!

11.25.2011

Roasted Garlic Mashed Potatoes

About seven years ago, I made a mashed potato recipe that used garlic and red potatoes with the skins left on. This past year, my mom and sister asked me to make it again. Even though I hadn't made it in seven years. And I didn't have the recipe. Oh, boy.

Luckily, the internet is a magical place, and I found a new recipe that utilized both required elements AND had a special twist: Romano cheese. I was a bit worried that my family wouldn't like the cheese--in fact, my sister tasted it right away--but it added such a depth of flavor to the potatoes, they didn't even need gravy! This will be my new go-to mashed potato recipe.


You will need:
5 pounds unpeeled red potatoes, quartered
1.5 sticks of butter, room temperature
5 ounces Romano cheese, grated
2-1/2 teaspoons salt (plus an extra pinch)
2-1/2 teaspoons dried oregano
Head of garlic
2 tablespoons of olive oil
3-4 tablespoons of milk

First, while the original recipe didn't call for this, I decided to roast the garlic because raw garlic can have a strong flavor; roasted garlic is a more mellow and sophisticated flavor. To roast garlic is actually really easy, too. Simply preheat your oven to 400 degrees, cut off the heads of your garlic cloves, and remove all the extra layers of skin surrounding the cloves (just be sure to leave enough of the skin to hold the cloves together). Drizzle with olive oil, cover with aluminum foil, place on a baking sheet, and bake for 30-35 minutes. Break down of process here. Garlic will be soft and look carmelized when done! See here:


Mmmm...soft and yummy. While the garlic cools, put your potato water on to boil and quarter your potatoes. When the water is ready to go, add the potatoes and boil until soft. Make sure you set your butter out to soften by now--I always forget to do so, and it makes it so much easier to work with the butter when it is already soft. Grate the Romano cheese.

When the potatoes are ready, drain and place in a large bowl. Add butter and use a potato mashed to mash the potatoes and integrate the butter into the potatoes (apparently, you should always add the butter before the milk so the two can better bond--the things one learns while reading!). Add in cheese, salt (all of it except for the extra pinch) and oregano and mix well.

And now the fun part--the garlic. I saw this on both Rachel Ray and Giada DeLaurentiis's shows: carefully remove the cloves of garlic from the skin. Roughly chop the cloves and sprinkle with the pinch of salt. Then, using the wide, flat part of your knife, drag your knife across the garlic, smearing it into your cutting board and making a paste. Doing this ensures that everyone gets the taste of garlic in their potatoes without biting into a hunk of garlic. Add garlic paste to potatoes.

Finally, if potatoes are too thick, add milk one tablespoon at a time until you reach your desired consistency. Serve warm and enjoy at your next holiday dinner!


11.24.2011

Cinnamon Rolls

My amazing husband turned 28 this past November 21st. So first, let me again wish a very happy birthday to the world's greatest hubby (as should you, reader, since he suggested this blog in the first place!).

Now then. I decided to make some cinnamon rolls for my husband's birthday breakfast, as he LOVES those Cinnabon cinnamon rolls they sell at the mall. It's been awhile since I've had a Cinnabon, but I think that these are a bit less dense than Cinnabon--though every bit as delicious. Huge, soft, cinnamon-y, and with loads of gooey frosting, these are sure to become a staple in our breakfast line-up! (And if you can't eat 16 at once, you can freeze them for future breakfasts, too!). Original recipe found here.


 You will need:

For dough:
1/4 cup warm water
1/4 cup butter, melted
1/2 (3.4 ounce) package instant vanilla pudding mix
1 cup warm milk
1 egg, room temperature
1 tablespoon white sugar
1/2 teaspoon salt
4 cups bread flour
1 (.25 ounce) package active dry yeast

For cinnamon filling:
1/4 cup butter, softened
1 cup brown sugar
4 teaspoons ground cinnamon
3/4 cup chopped pecans (optional: I did not use these)

For frosting (doubled from the original recipe--I like a lot of frosting):
1 (8 ounce) package cream cheese, softened
1/2 cup butter, softened
2 cups confectioners' sugar
1 teaspoon vanilla extract
3 teaspoons milk

First, add yeast to warm water (be sure the water is warm--the yeast needs warm temperatures to activate). Set aside for ten minutes or until it becomes foamy. Meanwhile, cream together the pudding, butter, and sugar. Add milk, egg, and vanilla. Add the yeast mixture. Finally, add the salt and flour, one cup at a time until combined. Knead by hand on a floured surface until dough is elastic. Place dough in an oiled bowl for an hour and allow to rise until double in size.

While the dough is rising, prepare the filling. Cream together butter, sugar, cinnamon, and, if desired, pecans or raisins. Set aside.

When dough is ready, roll out the dough into a 17x10 inch rectangle. I am terrible about guesstimating sizes, but this is about the size of a large cutting board. Sprinkle the cinnamon filling on the inside of the rectangle. Next, roll the dough from the longer side until you have a cinnamon roll log. Cut into 16, one-inch slices and place in a greased pan for an additional hour, until the rolls have doubled in size. (You may want to refrigerate the rolls first to make cutting a bit easier).

Bake cinnamon rolls at 350 degrees for 12 to 16 minutes. When they come out of the oven, the dough should be firm but not brown and look something like this:


Finally, prepare the frosting. Cream together the butter and cream cheese. Add milk and vanilla extract. Then, in batches to avoid a sugar explosion, add in the powdered sugar until the frosting thickens. Spread liberally over all cinnamon rolls while rolls are still warm. See below:


And that's all there is to it! With the wait time for the dough rising, the process does take a few hours. BUT, most of it is not active cooking time, and if you have a family of four, you can enjoy delicious, homemade cinnamon rolls four times for only one day's worth of cooking. And since the husband ate two, the recipe passes the seconds test--so you won't regret the effort once you bite into one! So, break out your rolling pin and inner baker, and enjoy!


11.20.2011

Ham and Split Pea Soup

I hate peas. Growing up, I had parents who belonged to the "Clean Your Plate" club style of eating. And understandably so--their own parents lived through the Great Depression, so you didn't waste perfectly edible (if slightly gross-tasting) food. However, I could not NOT stomach some of my mother's dishes, and once, I negotiated with my father to get out of eating her Hungarian short ribs. What did I have to eat instead? An entire can of peas--my dad bargained hard. It took me three hours, and I still to this day consider the trade a fair one--but I also still hate peas.

That said, I adore split pea soup. I know, I'm weird. But split pea soup delivers all the comforting qualities of any other cream-based soup with TONS of nutritional value--add to that how insanely easy it is to make, and you will love it too! Original recipe found here.


You will need:
16 oz. bag of dried split peas
2 cups of chopped ham (or the ham off a ham bone, if you have the time)
3 large carrots (peeled and sliced)
1/2 cup chopped onion
2 ribs of celery (chopped)
2 cloves of garlic
1 Tablespoon of Lawry's seasoned salt
1/2 teaspoon of pepper
2 teaspoons dried parsley
1/2 teaspoon dried marjoram (note: original recipe called for one bay leaf--I just substituted this since I was leafless)
1.5 quarts HOT water

Are you ready for the simplicity of this recipe?
1) Rinse and sort your peas on a dish towel. (Bags of dried peas often still have a few small stones scattered among the peas, and you don't want to bite into these)
2) Spray a crockpot with non-stick spray. Layer the following into the crockpot in the following order:

  • Rinsed split peas
  • Ham
  • Vegetables
  • Spices
  • Hot water
3) Do not stir. Cook on high for 4 to 5 hours (4 if you still want some of the peas to maintain their shape, 5 if you want the peas completely broken down and creamy).
4) There is no step 4 because you're already DONE!

Note that this recipe can easily be made vegetarian by omitting the ham. Either way, enjoy a bowl of creamy split pea soup the next time you want a bowl of comforting and healthy deliciousness!


11.12.2011

Roast Beef and Cheddar Sandwich

This sandwich is fairly simple, but the combination of flavors was so delicious, I had to post this. When looking for a sandwich to pair with the Savory Vegetable Soup, I scoped out Panera's website (since they have some pretty tasty sandwiches), and came across their Asiago Roast Beef sandwich. Roast beef and cheese are always delicious, but the horseradish sauce added a spicy kick that really made it something special. Give it a try!


Sandwich ingredients (makes 4 sandwiches):
-Ciabatta bread (4 rolls)
-1-2 packages of thin-sliced roast beef (we used pre-packed lunchmeat)
-4 slices thick-sliced sharp cheddar cheese
-1 red onion (sliced)
-1 Roma tomato (sliced)
-Lettuce or spinach leaves (if desired)

Horseradish sauce (recipe found here)
-1/2 cup sour cream
-3 tablespoons mayonnaise
-2 tablespoons creamy horseradish
-1 teaspoon dry mustard
-1/8 teaspoon crushed red pepper flakes
-Salt and pepper to taste

Assemble sandwiches as follows: bottom of roll, roast beef, lettuce, tomato, onion, cheese, horseradish sauce, top roll. Place sandwich in panini press until cheese is melted and sandwich is warmed through. Serve immediately and enjoy!

Savory Vegetable Soup

A friend of mine recently asked if I could teach her how to make vegetable soup--to which I said, of course! That said, my love of vegetables has never quite mirrored my love of cheese, so I needed to locate a recipe. And in trying to find one, I must admit--I felt a bit bad for vegetarians! Finding a vegetable soup that does not contain some sort of meat product is quite a challenge. Even this one, which I used, had to be modified slightly due to its call for chicken broth. That said, this soup took about 10 minutes to put together and was delicious, so I now have an exciting way to get my veggies in the future!


Here is what you will need:

1 (14 ounce) can vegetable broth
1 (11.5 ounce) can tomato-vegetable juice cocktail (I used V-8)
1 cup water
1 large potato, diced
2 carrots, sliced
2 stalks celery, diced
1 (14.5 ounce) can diced tomatoes
1 cup chopped fresh green beans
1 cup fresh corn kernels
1/2 tsp of Cajun/Creole seasoning
salt and pepper to taste

First, dice your vegetables. Second, pour everything into a large sauce pan. Finally, bring to a boil, then simmer for 40-45 minutes. That's it! And, if you're a bit pinched for time, you can always use frozen or canned vegetables and save yourself the prep time on chopping the vegetables.

The Cajun seasoning really makes the soup, because it gives an added depth to the flavor and a slight hint of heat. You can even alter the recipe to add in your favorite vegetables or some orzo for a carbohydrate--and no matter what, you will have a healthy dish to serve yourself and your loved ones. So grab some V-8, your favorite veggies, and give this a try!

Elyse--and everyone else--I hope you enjoy this recipe! :)

11.05.2011

Risotto with Chicken Sausage and Peas

There is a restaurant near our apartment which serves a variety of foods, from steak to macaroni and cheese. Everything is delicious. The last time my husband and I ate there, however, they had a sausage risotto as one of their specials. Now, the sausage was a bit greasy and there was a lot of it, so it was a bit too rich to finish. So I made a *slightly* lighter version of the dish to eat at home based on this recipe. Risotto is a bit more time-consuming than a standard pasta, but the creamy texture that results makes it so comfort-foody, you'll forget how the deliciousness even made it into your bowl.


You will need the following ingredients:

1 tablespoon olive oil
1 (16 ounce) package Sweet Italian Chicken Sausage
1 cup chopped sweet onion
1 tablespoon minced fresh garlic
1/2 teaspoon dried thyme
1 1/4 cups Arborio rice
1 cup Chardonnay or other dry white wine
3 1/2 cups chicken broth, low-sodium
1 cup frozen petite sweet peas
Salt and pepper to taste

First, chop your chicken sausage into bite-sized pieces and chop your onion, garlic, and herbs. Heat your oil in a dutch oven or large skillet, then add your onions and cook until softened. Add in your garlic, herbs, and chicken sausage and heat through.

Next, add the rice and wine to the skillet. Cook until wine is absorbed by the rice, and begin adding chicken broth one cup at a time. Once the rice has absorbed a cup of the chicken broth, add another cup to the rice mixture. Repeat until all 3 1/2 cups have been absorbed. As soon as you are on your final 1/2 cup of broth, add the frozen sweet peas to the mix. 

Add salt and pepper to taste, and enjoy!


11.04.2011

Pizza Margharita

 In our house, Sunday is pizza night. Since we usually spend the day grocery shopping, catching up on work, and getting ready to watch The Walking Dead (zombies are intense and require mental preparation), I usually like to just pop in a frozen pizza and relax on Sunday nights. That said, I have lately been fascinated by all the things I can just make myself, and I had yet to make homemade pizza dough....add to that the fact that my husband's favorite pizza, Pizza Margharita, is best when fresh, and I decided to see what I could whip up at home with this dough recipe. Turns out, making a pizza dough is actually incredibly quick and delicious, so give it a try!


You will need:
For the dough:
2 1/2 cups all-purpose flour
1 (1/4 ounce) package active dry yeast
1 tablespoon sugar
1/4 teaspoon salt
1 cup warm water
1/2-1 tablespoon olive oil
cornmeal, for sprinkling

For the sauce:
28 oz. can of whole tomatoes, drained
6 oz. tomato paste
6 oz. tomato sauce
2 tablespoons of Italian seasoning (oregano, basil, etc.)
1 tablespoon of sugar
1 teaspoon of salt
*My sauce measurements are always by taste, so the spice amounts are an approximation

For the toppings:
Ball of fresh mozzarella cheese
Fresh basil leaves

First, get your sauce going. Simply mix all ingredients together in a medium saucepan, and use a wooden spoon to chop up the whole tomatoes. Bring sauce to a boil, then simmer on medium-low heat for at least half an hour (longer is better....but I was hungry).

While your sauce is simmering, preheat your oven to 425 degrees, then make your dough. Add sugar and yeast to the cup of warm water and allow to sit for ten minutes, or until the yeast gets foamy. Pour into a large bowl, and add the oil, salt, and flour.

Combine the ingredients until they start to form a mound of dough, then turn the mixture out onto a floured surface. Knead the dough for 5-8 minutes, until smooth and elastic. If the mixture is still sticky after a few minutes of kneading, add more flour.

Cover the dough and allow it to rest for 20-30 minutes (I think I lasted for 19; don't judge me). In the mean time, wash, thoroughly dry, and chop some fresh basil leaves. Cut your mozzarella ball into thin slices. Set aside.

After it has finished resting, divide the dough in half. I froze one ball of dough. The other I rolled out to fit my 13" pizza pan (using my rolling pin--dough tossing is a skill I will learn some other day). You can always use all of the dough if you are making two pizzas, of course. Sprinkle your pizza pan with cornmeal and place your dough on top, pierce all over with a fork, then pre-bake your soon-to-be pizza crust for 10 minutes.

Take your sauce off the stove and spoon over the top of the baked crust (be careful not to add too much, or your pizza will be watery; remember that the tomatoes still have a good deal of water). Layer the cheese slices and basil on top. Finally, bake for an additional 8-10 minutes, or until cheese is melted and the crust is slightly golden.


Pair with a good wine and an episode of The Walking Dead, and you're in for an intensely delicious meal. Enjoy!


11.03.2011

Orzo and Chick Pea Salad

There's something really exciting about trying out new ingredients. That's why this orzo-based salad was so fun to make (well, that and the goat cheese), since I've never really had orzo before. So what is orzo? Well, orzo is basically tiny little rice-shaped pasta bits--like spaghetti minus the effort of twirling around a fork. Add to that some really good-for-you ingredients--and did I mention the goat cheese??--and this recipe provides you with a delicious side salad or light lunch for your next meal!


Here's what you will need:

  • 1/2 pound orzo (cooked according to package instructions)
  • 2 tablespoons extra-virgin olive oil
  • 1 small to medium zucchini, diced (I also peeled mine first, but this is totally personal preference)
  • 1/2 red onion, chopped
  • 3 cloves garlic, chopped
  • Salt and freshly ground black pepper
  • 1 (15-ounce) can chick peas, drained
  • 1/2 cup parsley leaves, chopped
  • 1/4 cup mint leaves, finely chopped (I didn't have these, so I left them out--I'm sure they would have been delicious, however!)
  • 1/2 cup feta or goat cheese, crumbled (I used goat cheese--yum!)

  • How simple is this dish to make? 

  • First, cook your orzo according to package instructions, and prep your veggies.

  • After prepping your veggies, give them a quick saute in olive oil in a large skillet until your onion and zucchini are soft, and your garlic is fragrant. Toss in your salt, pepper, chickpeas, parsley, mint, and orzo to allow the remaining ingredients to warm (and the flavors to meld). Stir.

  • The last step is your choice. I added in my goat cheese here so that it melted and provided a creamy, sauce-like consistency for the salad. I also ate my salad warm for lunch. However, you could also choose to let the salad cool and crumble the goat cheese into it. Either way, it will be delicious.

  • Enjoy! 

10.17.2011

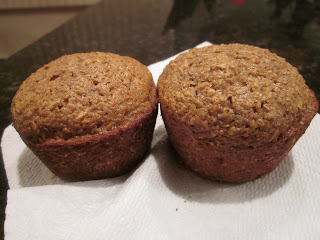
Bran Muffins

Every now and then I feel bad posting recipes that aren't the healthiest for you--only every now and then, but still--so I figured I would post one of the healthier recipes I found: a breakfast classic, the bran muffin. Full of fiber and homemade goodness, these bran muffins make a perfectly healthy breakfast option--and they are tasty, too!


You will need:

  • 1 1/2 cups wheat bran
  • 1 cup buttermilk
  • 1/3 cup applesauce
  • 1 egg
  • 2/3 cup brown sugar
  • 1/2 teaspoon vanilla extract
  • 1 cup all-purpose flour
  • 1 teaspoon baking soda
  • 1 teaspoon baking powder
  • 1/2 teaspoon salt
  • (You can also add raisins if you like--I may try mini chocolate chips one of these days!)

  • First, mix together your wheat bran and buttermilk, and let it stand for 10 minutes. While you're waiting, preheat your oven to 375 degrees, and grease a muffin pan (this recipe will make 12 muffins).

  • Next, mix your applesauce, egg, sugar and vanilla together, and add to the buttermilk mixture. In a separate bowl, sift together your dry ingredients (your flour, baking soda, baking powder, and salt). Fold flour mixture into buttermilk mixture until just blended--remember not to over-mix! Fold in raisins or chocolate chips if you are using them, and use an ice cream scoop to pour the batter evenly into the prepared muffin pan.

  • Bake for 15 to 20 minutes, or until a toothpick inserted into the center of a muffin comes out clean.

  • Finally, enjoy your moist, apple-y bran muffins--and the feeling that you are eating something good for you!


10.16.2011

Chicken Parmesan

  • Like so many other recipes, I had chosen this one as an attempt to make something healthy. But, at the end of a long, difficult day, a recipe that was originally meant to be a baked chicken breast with some tomato sauce on top tends to morph a bit. You remember that you have breadcrumbs. Your husband has some leftover cheese from his week's lunches. You haven't been to Olive Garden in awhile. You realize that these things, in combination, sound way better than a tomato-y piece of chicken all by its lonesome. And really, doesn't your chicken deserve to have breadcrumbs and cheese?

  • Of course it does.

  • So, I give you: chicken parmesan! (And yes, there is actual chicken under that cheese...)


  • You will need the following:

  • 2 eggs, beaten + 1 tablespoon of water
  • 1 cup grated Parmesan cheese
  • 7 ounces seasoned bread crumbs
  • 1 cup of flour
  • Salt and pepper
  • 6 skinless, boneless chicken breast halves
  • 1 tablespoon vegetable oil
  • 12 ounces pasta sauce (or make your own--I used canned tomatoes, sauce, paste, and spices to create a more homemade taste)
  • 6 slices Monterey Jack cheese
  • 6 tablespoons of shredded parmesan cheese
  • *Spaghetti, if serving

  • First, if you are making your own pasta sauce, prepare that an hour or more in advance. This will give the flavors time to meld before you begin your chicken. Next, mix your salt and pepper in with your flour in a shallow dish. Pour your beaten eggs with water into another shallow dish, and your breadcrumbs into yet another to create your chicken parm assembly line.

  • Then, one at a time, dip your chicken breasts into the flour, then into the egg wash, then finally, into the breadcrumbs. Your chicken is breaded and now ready for cooking!

  • *If you are serving spaghetti, this would be a good time to get your water on the stove for boiling.

  • Preheat your oven to 375 degrees. Warm a large skillet over medium high heat and add your oil. Once oil is warmed, add your breaded chicken breasts and cook for approximately 4 minutes per side, until each side has turned a golden brown. Finally, place your oven-safe skillet with your chicken breasts into the oven to allow them to finish cooking for another 10-15 minutes. Top with cheese when there is about five minutes left for them to cook.

  • Serve with spaghetti, sprinkle with basil, and your healthy-turned-comfort food dinner is ready to serve. Enjoy!

  • [Note: recipe is a combination of the ingredients and techniques found here and here]